FastBoot Quickstart
Creating a New Ember App
This quickstart guide will walk you through creating a simple Ember app that fetches data from GitHub, then renders it using FastBoot.
To start, make sure you've got Node.js and npm installed. If you've never used Ember before, you may want to run through the Ember quickstart guide.
Install Ember by running:
npm install ember-cli -g
Create a new application by running:
ember new github-fastboot-example
Once created, cd into the github-fastboot-example directory.
We need to fetch data from the GitHub API, but there's a small problem: the browser uses XMLHttpRequest to fetch JSON data, while in Node.js you'd use the http library. We'll be running the same Ember.js app in both environments, so we need some way of making it work in both.
Let's install a tool that will let us write the same code whether our app is running in the browser or on the server. Code that runs in both places is sometimes called universal or isomorphic.
Run the following command to install ember-fetch:
ember install ember-fetch
Under the hood, the ember install command is just like npm install, but automatically saves the addon to your package.json file.
Rendering the Model
In Ember, routes are objects responsible for fetching model data. Let's make a route that fetches information about you from GitHub.
Run the following command in your terminal:
ember generate route index
This will generate a new route called index. By convention, index is the name of the route for when the user visits the root path, or /. Think of it like index.html.
Open the newly-created app/routes/index.js file in your code editor. Let's add a method called model() to the route that fetches information about your user from GitHub.
We'll use the fetch polyfill exposed by the ember-fetch addon that lets us write universal fetching code for both the browser and Node.js. A polyfill is a library that provides a standardized API that isn't available in all environments yet. In this case, it's polyfilling the Fetch API.
Implement the model hook like I did below. You might want to change the username in the URL from mine to yours.
import Route from '@ember/routing/route';
import fetch from 'ember-fetch/ajax';

export default class Application extends Route {
  model() {
    return fetch('https://api.github.com/users/tomdale')
      .then(function(response) {
        return response;
      });
  }
}
Next, let's render that model in the index template. Open app/templates/index.hbs and type the following Handlebars template:
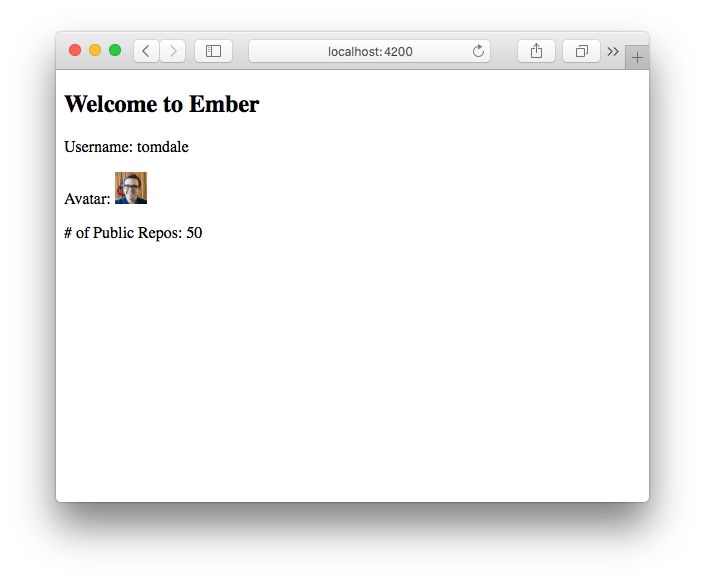
<p>
  Username: {{model.login}}
</p>
<p>
  Avatar: <img src={{model.avatar_url}} width="32" height="32">
</p>
<p>
  # of Public Repos: {{model.public_repos}}
</p>
Once you've made those changes (don't forget to save!), switch back to the terminal and run the development server:
ember serve
This runs a local development server you can use to verify your program is running correctly. Visit localhost:4200/ in your browser. You should see your GitHub profile rendered below a title that says "Welcome to Ember.js".
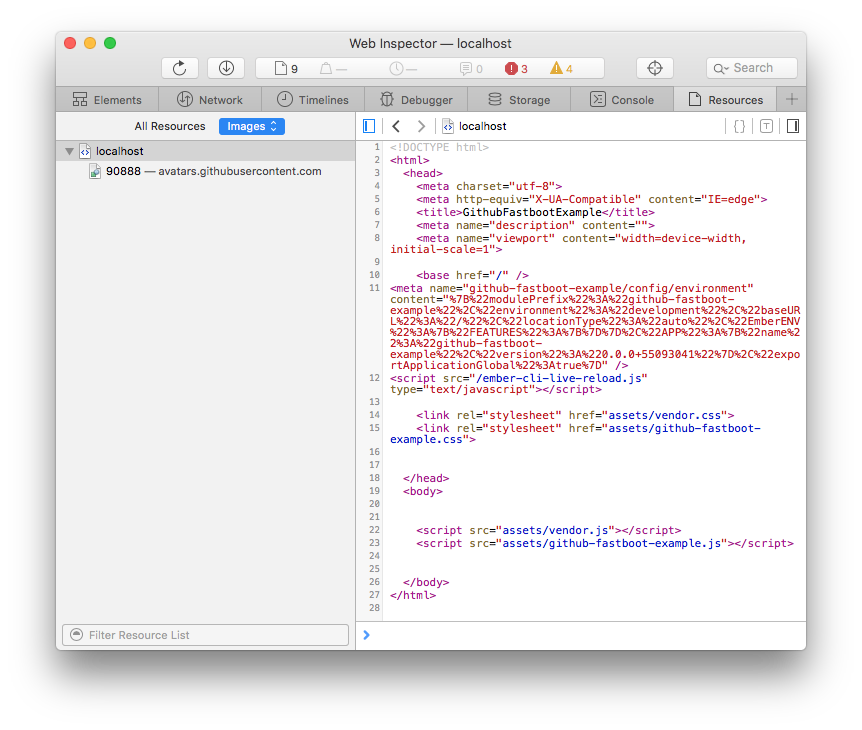
We've verified we've got a working application, but there's one problem. If you use your browser's View Source feature, you'll see that there's no HTML being rendered: just an empty body and some <script> tags. Let's fix that.
Install FastBoot
Back in the terminal, stop the development server by hitting Ctrl-C on your keyboard.
Next, install FastBoot:
ember install ember-cli-fastboot
Let's turn on server-side rendering and make sure it works. Start the FastBoot server like this if you have ember-cli 2.12.0 and above in your app:
ember serve
Note: ember fastboot command is soon going to be deprecated and removed in FastBoot 1.0. Please refrain from using it as it has live-reload and other issues
View the FastBoot-rendered content by visiting localhost:4200/. Note the same port! ember serve can serve render your app on server side as well. Moreover, all options of ember serve will work with FastBoot (example --proxy, --port etc).
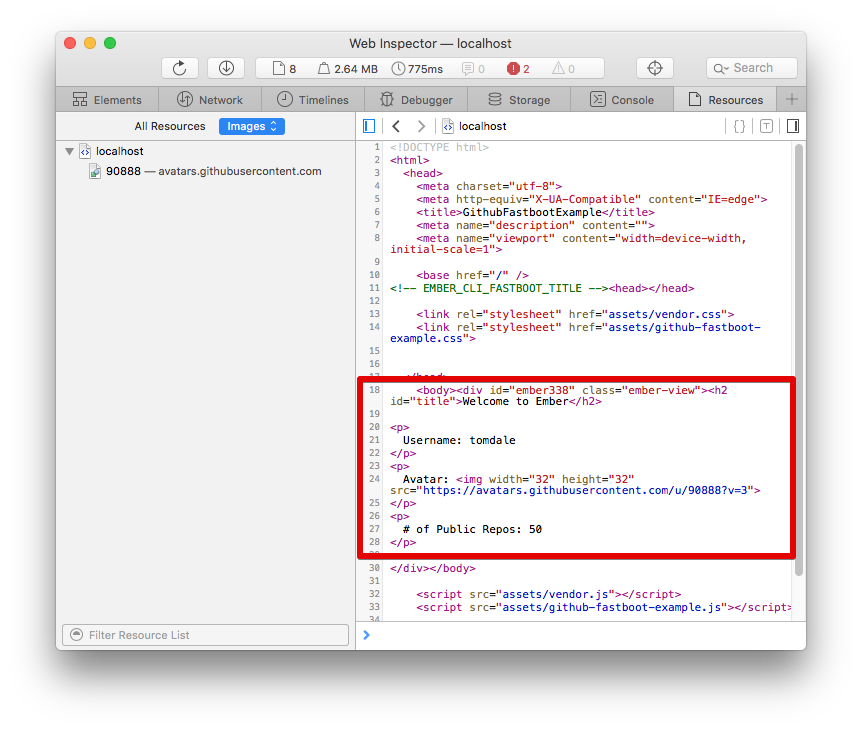
Everything should look just the same as before. The only difference is that, this time when you View Source, the <body> tag is populated with the rendered HTML content.
Congratulations! You've just built your first FastBoot application.
Let's review what we've accomplished here:
- We created a new app in one command with
ember new - We used the universal library
ember-fetchto request AJAX data - When rendering in Node.js, the FastBoot server requested data from GitHub on the user's behalf
- We wrote an app that has the benefits of traditional server-side rendering and the benefits of client-side JavaScript, in a single codebase. No hacks, just installing an addon.
Now that you've got your first FastBoot app, it's time to start adding FastBoot to your existing apps. Or, learn how to deploy your new app by learning about Deploying.
Disabling FastBoot with ember serve
If your app is running ember-cli 2.12.0-beta.1 and above, you can now serve your FastBoot rendered content with ember serve as well.
You can also turn off the server side rendering on a per request basis using fastboot query parameter. To disable FastBoot rendered content, visit localhost:4200/?fastboot=false. You can enable FastBoot rendered content again by visiting localhost:4200/?fastboot=true.